Wednesday, May 9, 2012

Microwave Mug Muffins

Yesterday I was suffering from "Emptyfridge-itis".  It's been a busy week around here, and I was running low on groceries and pantry items.  Trying to come up with a healthful, gluten free breakfast, when you are running low on ingredients, was a huge challenge.

So I decided to do some quick research.  I googled microwave gluten free muffins, and came up with a winner!  I found it at Spark Recipes, and although it was the first time I tried a recipe from that site, I was encouraged.  The recipe I found used ingredients that I actually had on hand.  It was also a super quick recipe, I mean it took me about 3 minutes to make, start to finish. 

This recipe is for a Flax Muffin in a Mug.  Now, let me tell you, these are not pretty muffins.  After all, there is no browning involved.  These are dense muffins, in fact, I was nearly full after eating half of it.  It satisfied my husband, in fact, he was amazed that we had something bread-like in only a minute or so of cooking.
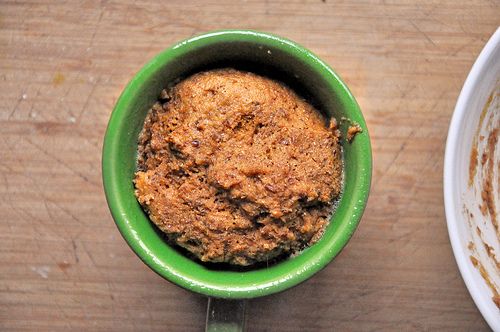
This is the picture from the original poster.  See, not pretty, but VERY filling and tasty.
This is my take on the recipe, follow the above link for the original.


Ingredients:

  • 1 tsp coconut oil
  • 1 egg, slightly beaten
  • 1/8 C. ground flaxmeal
  • 1/8 C gluten free flour (I used a combo of almond, teff and gluten free oats)
  • 1/2 - 1 tsp. pumpkin pie spice (you need to use it for more things than pumpkin pie!)
  • 1 tsp vanilla
  • 1/2 tsp. baking powder
  • 2 tsp sugar, stevia crystals, honey, agave nectar or Splenda


Optional:

2 TBS or your favorite mix ins.  I used coconut and almonds.  Try blueberries, other berries, banana, craisins, raisins, dates, granola, chocolate chips... you name it!


Directions:


Spray a mug with your favorite non stick spray.  I used a vegetable spray.  Microwave the coconut oil for a few seconds to melt it.  Swirl it around the mug.  In a small bowl, add the rest of the ingredients and mix.  Pour the melted coconut oil into the bowl and mix it in as well.  Add the batter to the mug, and microwave for one minute.  The original recipe calls for mixing it all in the mug, but I didn't want mine to stick, so I did it in a separate bowl.  You can try it either way.

Be careful, try 45 seconds and if it isn't done, try adding 5 seconds at a time until it is done. Every microwave is different, so you may have to "play" with the recipe. It took mine 80 seconds.

When muffin is done, turn it out onto a plate, slice in half and top with your favorite jam, or low fat cream cheese.  Or, you can just eat it straight from the mug.  It's yours, have it the way you like it!  Mine tasted like a bran muffin because of the teff flour.  It was so filling. 


I hope you try this!


Monday, April 30, 2012

Another Meatless Monday

Here it is again, Monday!

For nearly the past year, I have been practicing Meatless Monday at home.  There have been several weeks where it wasn't practical, but I do make a concerted effort to observe my self-imposed dietary restriction.  I like to go meatless at least once a week, it's good for your heart, and good on the budget.

My 14 year old son gets a kick out of keeping me in line.  Whenever I make dinner on Monday, he gives me the third degree about what I am making.  "Is that meatless Mom? Did you put meat in that?"

He is the most adventurous of my kids when it comes to trying different foods.  His list of likes is way longer than his dislikes.  He gives me a bit of an ego, because he absolutely LOVES everything I make.  Between him and my hubby, I can do no wrong in the kitchen. My girls like my cooking too, but they are harsher critics.  My middle child is the only one that is even remotely picky.  She has a textural issue with raw tomatoes, and mushrooms cooked or raw.

I grew up in a large family.  Picky eating was not allowed.  If dinner was on the table, you ate what was served, and you liked it!  There was no coddling of delicate taste buds.  Well, not that I ever noticed.  For me, meals were always an occasion to celebrate.  My son feels the same way, and I love that he does.

So, since today is Meatless Monday, I have to find something fun to cook, something different.  I don't usually do a pure vegan dinner, with specialty products.  Everything I cook is easy to get at your regular grocery store. I do tend to lean towards legumes.  I have fallen in love with Indian food lately, something spicy is always good.

That's it!  Chickpea Stew is the answer.  It has tomatoes, but my teenaged daughter will eat it if they are stewed.  It is rich, spicy, fulfilling, healthy and meatless.   Everything we look for.


Chickpea Stew

Ingredients:

  •  olive oil
  • 3 stalks celery sliced
  • 2 onions diced
  • 6 carrots sliced or diced
  • 2 turnips peeled and diced
  • 3 cloves garlic minced
  • 1/2 inch piece of fresh ginger peeled and minced
  • 1 6 oz can of tomato paste
  • 1 Tbs yellow mustard seeds
  • 3 Tbs Moroccan seasoning (or curry powder)
  • 1 Tbs cumin
  • 1 Tbs  garam masala
  • 4 cans of chickpeas rinsed and drained
  • 1 container vegetable broth
  • 2 16 oz cans of diced or crushed tomatoes (or one of each)
  • 2 bunches kale, cut off the stems and chopped roughly
  • 1Tbs sugar (optional)
  • Salt and pepper to taste


In a large stewpot, heat  2-3 Tbs olive oil on med-high heat.  Add the rest of the first 7 ingredients and cook until the onions soften.  Add the next 5 ingredients and stir to coat with the seasonings and tomato paste.  Cook for 5 minutes, to lightly toast the spices and tomato paste.

Cook the veggies, tomato paste and spices for 5 minutes. This picture was taken right before I added the tomato paste.


I have a neat trick to help you get the tomato paste out of the can with less waste.  Using your can opener, open the top and bottom of the can.  Remove the metal from the bottom, and using the top lid as a plunger, push the paste out.  Remove the top and discard.  How easy is that?


Remove top and bottom, use top lid as a plunger.
So easy! 

Now add the remaining ingredients.  You may or may not need sugar, it depends upon the tomatoes.  Sometimes just a little sugar can balance out the acid of the tomatoes.  Wait to add sugar until you are done cooking.  Taste and then add if you need it. 

Stir, cover, and simmer on med-low for 30 minutes. If the carrots and turnips aren't cooked through, cook another 15 minutes or so.

Be sure to taste after the 30 minutes for seasoning.  This is where you would add sugar if needed.  Sometimes you may need to add a splash of vinegar or lemon juice if the acid level is not to your liking.  I prefer it slightly sweet, slightly tangy.  My tomatoes today were acidic, so I balanced it with the sugar.

You can add chili powder, or chilies if you like it spicy.  This time I left it mild.  Serve with pita bread or crackers for dipping. 
Cut the kale at an angle, cutting the greens from the stems.  Rotate the stems so you can cut off the majority of the greens.  You can clean them the old fashioned way, by tearing the greens off the stems, but I actually like some stems in the stew, it adds another texture.
Be sure to drain and rinse your chickpeas.  They come in a liquid that is fairly slimy and not pleasant.

Our dog, Miss Taterbug, or Tater for short.  She gets all my carrot ends and tops. If I don't share with her, she pouts. Ha!

Sunday, April 29, 2012

Pam's Black Bean and Corn Salad

I love the desert and all it's beauty.  I have lived in a desert, nearly all my life.  I currently reside in Goodyear, Arizona.  It is desert, but it is also an agricultural center in what we call "The Valley of the Sun".   I am surrounded by fields of cotton, chilies, corn, and flowers.  So even though the land around me may be different shades of brown, there are gorgeous patches of green. 

With all of this, you get heat.  Yes, it is hot in Arizona.  It makes you thank God for air conditioning.  I once heard a comedian, new to Arizona, say that he sweated in places on his body he didn't know could sweat just getting out of a car.  It's true, we have a dry heat, but it doesn't take long for your clothes to become sweat soaked in 112 degree temps.

Even still, I love my home state.  Those 112 degree days aren't that many.  The benefits of having abundant produce available year round, mild winters, and gorgeous sunsets makes up for the heat in my opinion.

When the summer is here, and it's too hot to cook something heavy, I like to make salads.  One of the favorites in our home is my black bean and corn salad.  It is one of the most flexible dishes I make.

We use it as salsa, or a stand alone salad.  We eat it on tacos, in burritos, on Mexican pizzas, or on top of baked potatoes.  It's wonderful cold, but just as delightful hot.  It can be spicy, or mild.  The leftovers, if you are lucky to have any, can be blended up into a bean dip.

You absolutely must try this salad.

Ingredients:

  • 3 cans of black beans, rinsed and drained
  • 1 or 2  cans of corn, drained (or you can use 2-3 fresh cobs of corn, kernels cut off)
  • 1/2 medium red onion diced
  • 4-5 green onions diced (I use the whole green onion, it's your choice)
  • 2-3 roma tomatoes diced (I like romas because they have less juice)
  • 1 jalapeno seeded, minced (totally optional)
  • 1 /2 to 1 cup fresh cilantro (I use a ton of cilantro because I love it, you can omit, or use another herb such as parsley or basil)
  • salt
  • pepper

Dressing:

  • juice of 2 limes
  • 1-2 Tbs olive oil
  • 1 tsp sugar
  • salt
  • pepper
  • 1 tsp cumin 


Cut the corn off the cob if you are using fresh corn.  I do this by inverting a small bowl inside a large bowl.  I prop the cob on the small bowl, then cut down the cob, letting all the corn fall into the bowl.  If you do this first, while your beans are draining, you can use the same large bowl to mix everything in.   

Rinse and drain your black beans.  Add them to the large mixing bowl.  The amount of corn you use is up to your taste.  I like more beans than corn.  I also prefer to use fresh uncooked corn for the crunch and sweetness.  If you don't have fresh corn available, go ahead and use canned corn.  I have also used canned hominy before and it was just as good.

When you dice the tomatoes, cut them in half and lightly squeeze the seeds and juice out.  Or run your fingertip through the center to scrape them out.  You don't want the salad to be too watery.

When you dice the jalapeno, cut the top off, slice it in half lengthwise, and using a small spoon, scrape out the seeds and white membrane and discard them.  Then cut lengthwise into julienne and dice.  If you prefer spicier food, keep the membrane.  If you don't like spicy, omit the jalapeno.


Add all the other vegetables and the cilantro and lightly mix.  Salt and pepper to taste.  Remember you are making a dressing, so don't over salt.


Mix your dressing in a separate cup or bowl.  You don't want a lot of dressing, because the salad is much better when it isn't watery.  I use a Pyrex measuring cup and a fork to whisk it.  Some limes have less juice than others, so it is entirely dependent upon that how many limes you need.  Sometimes I use red wine vinegar instead of lime, you can use that or lemon.  


I prefer the dressing to be on the tart side, so I use at least 2:1 lime juice to oil.  Add all the dressing ingredients to the cup and mix with your fork.  Taste it to see if you need more oil, or more vinegar.  I like mine to be sour/sweet/savory all at the same time.  It is a matter of taste.  


Always taste your food.  


Pour the dressing on the salad, mix, and refrigerate.  Mix before serving.  You can make this the day before, it tastes great as leftovers.  You can adjust this and add different things to it.  I have added crumbled Mexican cotija cheese (similar to feta), diced jicama, diced avocado, hominy, and even bacon bits.


The leftovers make a most excellent bean dip for Super Bowl parties.  Just puree it in the blender, add a little water or olive oil if you need to for smoothness.  Serve with tortilla chips.


This is the salad stuffed into a baked potato.


Saturday, April 28, 2012

Greek Lemon Chicken soup


Sometimes soup is just exactly what you need.  

This soup is so comforting, so creamy and lemony, bright and full of chicken flavor.  It is a favorite in Greek restaurants and homes, and I know why!  When I make a pot of this, my family go crazy for it.  Especially my husband.  He really enjoys this soup. 


Ingredients


  • 6 cups chicken broth
  • 1 onion, peeled and diced
  • 2 carrots, diced
  • 2 stalks celery, diced
  • 1 bay leaf
  • meat of 3 chicken breasts shredded
  • 1 cup long grain rice
  • 2 eggs
  • juice and zest of 3 lemons
  • 2 tablespoons finely chopped herbs (I used sage, you can use thyme, parsley or sage)
  • salt and pepper to taste


Bring chicken broth, and bay leaf to a simmer. Add chicken breasts, cover and gently simmer over low heat for 30 minutes. Remove chicken breasts, let cool slightly and pull or cut chicken into thin strips. Set aside. (If you don't want to cook the chicken in the broth, you can use a roasted chicken and shred the meat. I honestly made fresh chicken broth because I had the time. You can do this with store bought broth, make life easy!)


Strain soup and return to boil. Add rice and veggies and gently simmer for 20 minutes, then add chicken back to soup for another 5 minutes.


Whisk eggs until they are frothy, and whisk in lemon juice and zest. Add a cup of the hot soup to egg-lemon mixture, very slowly, whisking while you pour it in. Add another cup in the same manner. Take soup off the heat and add egg mixture to it. Add herbs, salt and pepper.


Cook's notes

I made twice this amount. I started by barely covering 3 carrots, an onion, a head of garlic, 2 celery stalks, 3 bay leaves, sage, and 5 huge chicken breasts on the bone with water. I slowly brought it to a boil, then turned it down and simmered for an hour or two. I took out the chicken, strained the broth, let the chicken cool and shredded it.


I then followed the above recipe, except double the amount. I used jasmine rice, you can use orzo pasta or whatever rice you want.


Enjoy!

Lentil Quinoa Soup

 We eat a lot of soup at our house.  It's easy, filling, and comforting.  We also like to do meatless Mondays, so I tend to turn to beans or lentils for those days.  This soup is mildly spicy, full of protein, and packed with flavor.  My family loves to eat it, especially if we have homemade flatbread along with it to dunk.  

I hope you try this, if you do, let me know what you think!


Lentil Quinoa Soup

2-3 TB olive oil
4 carrots
1 onion
2 celery stalks
3 cloves garlic
1 jalapeno
diced tomatoes (optional)
6-8 cups chicken, veggie or mushroom broth
2 tsp cumin
salt and pepper to taste
1lb lentils rinsed
3/4 C of quinoa

Optional spices: 2 tsp of curry powder, 5 spice powder, coriander, or any combo of them.  I used 2tsp curry powder, 1 tsp of a spice mix that is a bit like 5 spice powder


If you have a food processor, or a mini prep, it makes this so much easier.  I did a rough chop on all the veg, and threw them in the food processor until it was diced really fine.  This is a lentil soup, so you don't want huge chunks of veggies, you want them tiny like the lentils. If you don't have a processor, just do your best to dice it fine. Also, the heat of the jalapeno is in the membrane and seeds, discard if you don't want heat.  This soup is mildly spicy.

In a large pot, on med heat, warm up the oil.  Reserving the tomatoes, add the diced veggies, jalapeno and spices.  Lightly salt the veggies, don't over salt. Let the veggies sweat until softened. 5-10 minutes on med heat.   Add the lentils and stir to coat them in the spices and veggies.  Add the broth.  You can use water in addition to broth, or instead of broth.  I used about 6 cups broth and 2 cups water.

Bring to boil, reduce to a simmer.  Add in the quinoa, and stir.  Partially cover the pot and let simmer 30-40 minutes. Stir every few minutes so they don't stick to the bottom.   Lentils don't take long to cook, but like other legumes, they are starchy and you want to watch them so they don't stick and burn.  Add the tomatoes after 20 minutes or so, so they don't over cook.

Taste, add salt as needed and enjoy!